

28 October, 2025
10 mins read
10 mins read


Each month we will ask a Product Specialist what their favorite feature of RIB CostX is and how it can be used. This month, we are speaking to our Austin-based Product Specialist Alex Freeman.
Often, the measurements we take from a drawing require additional work after the actual measurement; these can be simple calculations involving taking a count and multiplying out an assumed length and width to get an overall area, or they can involve applying a known density of a material to arrive at a final overall weight of material based on a length or area.
My favorite feature in RIB CostX allows these calculations to all take place at the time of the quantity takeoff process, saving time and reducing the amount of work between measuring plans and compiling an estimate of labor and material. Expressions in measured dimensions were added to RIB CostX in our 6.5 release. By combining the use of some custom RIB CostX functions, like XNUMBER(), which allows us to extract specific numbers from a string of text, and the ability to refer to the dimension group name itself, we can store variables and construct powerful expressions that allow us to do virtually anything.
One area I like to use as an example of this is in taking off concrete construction. Whether you’re dealing with strip footings, spread footings, pile caps, piers, columns, beams, or slabs- dimension expressions keep us from having to transfer our measurements to a workbook later.
Adding dimension groups that use these extended expressions starts the same as any other dimension group. Before we get into creating the expressions, let’s look at a basic setup for Continuous Strip Footing. In the Name field of the Dimension Group Properties, we’re going to input all the information we need in order to calculate any quantities we want for costing that we can’t measure directly off of the drawing. We can also fill in the custom fields of the extended properties section to identify which elements of this strip footing we want to add additional information onto.

Now that we’ve defined all the basic information for the dimension group, we can start to take a look at the “Measured Dimensions” tab of the Dimension Group Properties window. From here we can define the math that will calculate out the concrete volume and formwork area quantities we’re after.
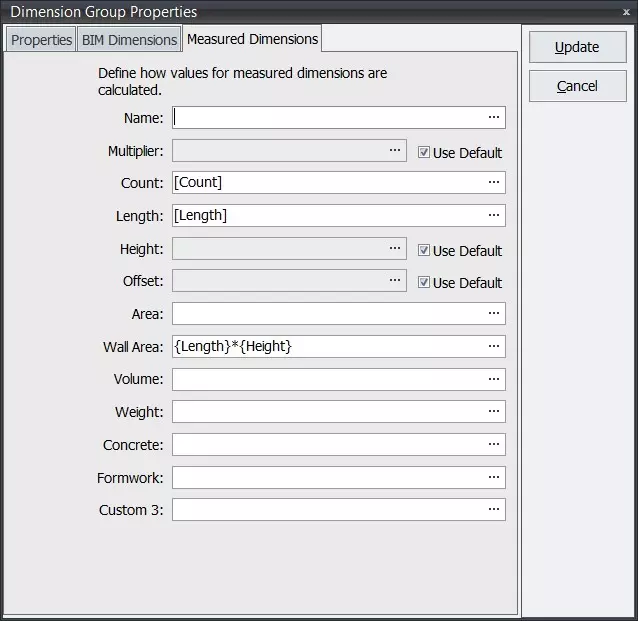
When switching to the Measured Dimensions tab for the first time, you’ll be presented with the default length type dimension view. Attributes in this view, which are enclosed in square brackets, are properties that are populated by taking off a quantity in either line mode or point mode. Properties enclosed in curly braces are referring to individual dimension fields. You don’t need to worry too much about remembering which does what in this case as we’re going to use the expression editor to build these fields for us. By default, on a length-type dimension group, RIB CostX will refer to a dimension group’s default height field, but for this example, we’re going to use the height we defined in the dimension group name instead. To do this, we need to uncheck the “Use default” tick box and select the ellipsis button at the end of the height field.

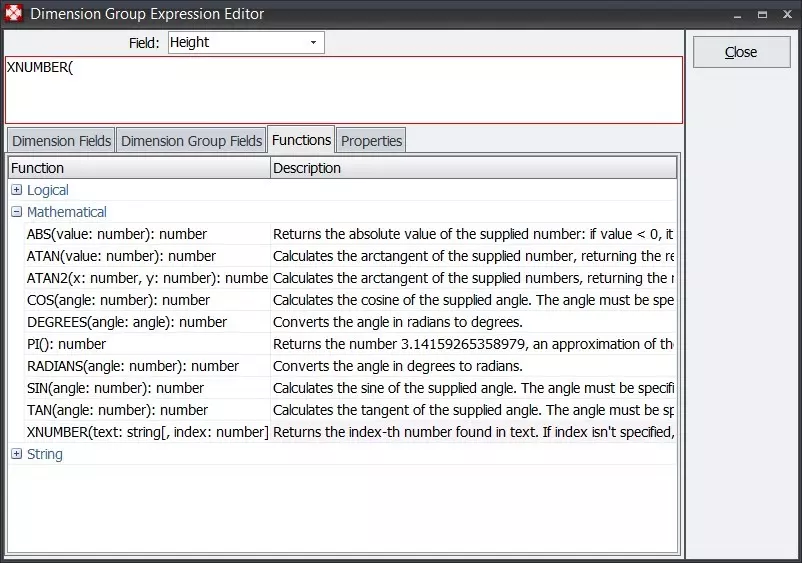
The ellipsis button will bring up the Dimension Group Expression Editor window, which is where we are able to start defining how our concrete and formwork quantities will be populated. As we’re starting with the height field, you’ll recall that when we defined our dimension group we gave it the name of 2’-0” x 0’-10; for this, the height is the second number. The first thing we need to do is find a way to retrieve the number out of that dimension group name, so we’ll use the XNUMBER() function which is located in the functions tab of the expression editor, in the mathematical section. In order to add the function into the expression editor we just need to double click on the function name and add an open parenthesis so we can start defining its attributes.
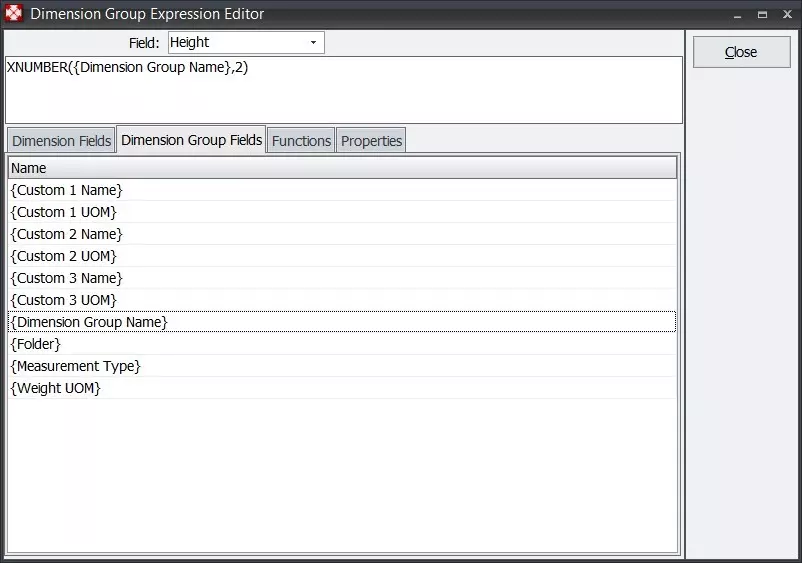
Because the number containing our height is located within the dimension group name, we’ll need to switch to the “Dimension Group Fields” tab and double-click on “Dimension Group Name.” Finally, we need to provide the XNUMBER() function with its second argument, which tells it which number to extract from the string; this is done by simply entering a comma and the number 2, and finally, a closed parenthesis.
When completed, our expression will look like the above. You may have also noticed that the red outline that was visible in the first step is gone; this means that the expression we’ve entered is valid. Once our height field is complete, the other fields we’ll need can also be filled in. The screenshot below outlines all the dimension field formulas we’ll need to calculate the quantities we outlined in the initial setup.
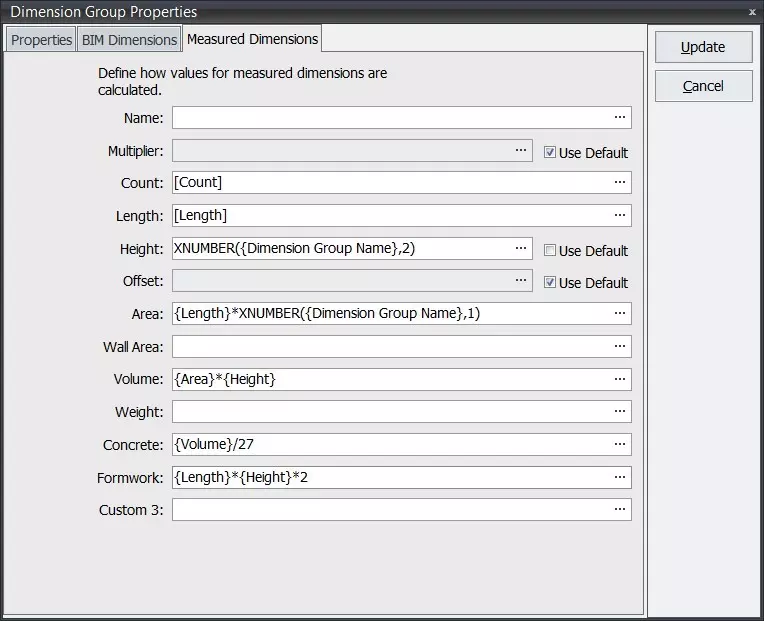
This setup can be replicated by typing in the formulas exactly as you see them here, or by using the expression editor the same way as we did for the height. The properties enclosed in curly braces are found on the “Dimension Fields” tab of the expression editor. For ease of copying and pasting you can find the formulas below.
| Height | XNUMBER({Dimension Group Name},2) |
|---|---|
| Area | {Length}*XNUMBER({Dimension Group Name},1) |
| Volume | {Area}*{Height} |
| Concrete | {Volume}/27 |
| Formwork | {Length}*{Height}*2 |
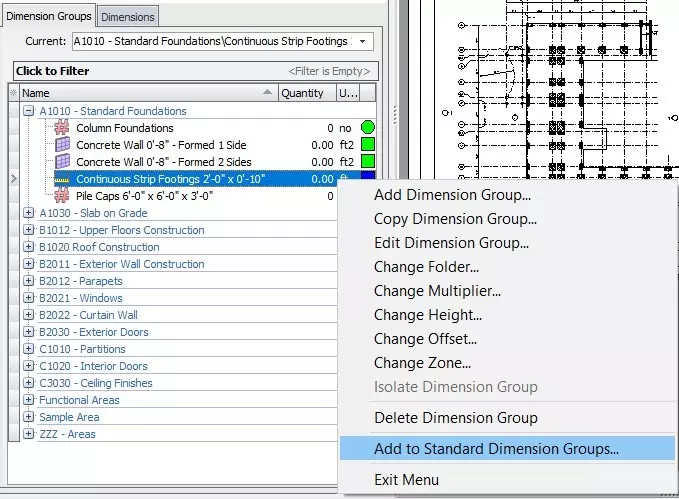
Once these have been entered, we can hit the update button and the dimension group will be added to the list for the currently open building. Because this process did take a bit of initial work to get the dimension group created, we can also add it to our standard list for future reuse without the entire setup process. Right clicking on any dimension group provides a context menu option to “Add to Standard Dimension Groups”, which will allow you to easily reuse it in the future.
At this point, if you complete some linear takeoff (in either point or line mode) and hover your mouse over the dimension group name, you’ll see that RIB CostX has extrapolated out the extended properties we were after. These extended properties can be used in the workbooks in the same manner you’d use any other dimension value via live linking.

Because we’ve used the dimension group name to define the size of our strip footing, we can alter the output of these extended properties simply by changing the size of the strip footing in the dimension group properties, or if you need additional sizes you can simply copy the dimension group to a new location, or add a new one from the standard dimension group list and alter the name.

Dimension group expressions offer Estimators and Quantity Surveyors using RIB CostX estimating software a way to produce all the quantities required for applying costs while still providing a large degree of flexibility and customization. Dimension Group Expressions are my favorite RIB CostX feature and one I hope you’ll integrate into your takeoff practices too. If you are not an RIB CostX user and are interested in testing this powerful platform, get your free demo today!

Ebook